SPRING BOOT SECURITY WITH OAUTH 2.0

OAuth 2.0 is an open protocol to allow secure authorization in a simple and standard method from web applications and etc. The OAuth 2.0 authorization framework is an open standard for token-based authentication and authorization. OAuth allows an end user's account information to be used by third-party services, such as Google, Facebook and etc, to obtain limited access to a web service. OAuth is one of the ways to publish and interact with protected data. It's additionally safer and more at ease way for people to give you access. I've kept it simple to save your time.
Spring Security and Spring Boot have made imposing an internet utility the use of OAuth 2 nice and easy.
In this precise, you'll construct an OAuth 2 web application and authentication server using Spring Boot and Spring Security.
Let's begin!
Create an OAuth 2.0 Server
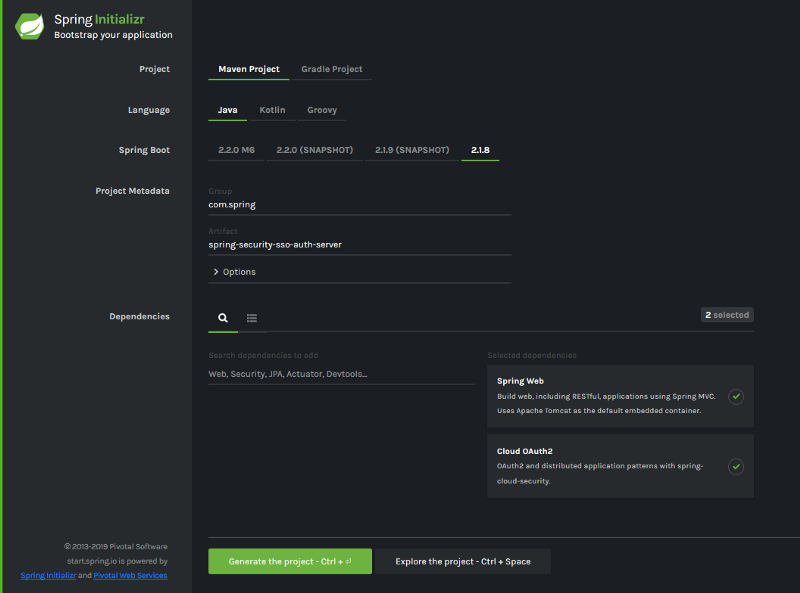
Start by going to the Spring Initializer and creating a new project with the following settings:
- The project type should be Maven (not Gradle).
- Change the Group to com.spring.
- Change the Artifact to spring-security-sso-auth-server
- Add these dependencies: Web, OAuth2

Download the project and copy it into your system. In this summary you're going to create two different projects, so you might want to create a parent directory, something like SpringBootOAuth somewhere.
Update the src/main/resources/application.properties to match:
(Note: you can also set up the user's username and password in application.properties, you just need to pull this username and password from application.properties to the SecurityConfig class.)
server.port=8081
server.servlet.context-path=/auth
#user.oauth.user.username=ravi_mengar
#user.oauth.user.password=12345
This sets the server port, servlet context path, and an ad hoc generated tokens the server is going to return to the client, as well as for our user's username and password. In production, you would need to have a bit more of a sophisticated back end for a real authentication server without the hard-coded redirect URIs and usernames and passwords.
Update the SpringSecuritySsoAuthServerApplication class to add @EnableResourceServer:
package com.spring.springsecurityssoauthserver;
import org.springframework.boot.SpringApplication;
import org.springframework.boot.autoconfigure.SpringBootApplication;
import org.springframework.security.oauth2.config.annotation.web.configuration.EnableResourceServer;

@SpringBootApplication
@EnableResourceServer
public class SpringSecuritySsoAuthServerApplication {
    public static void main(String[] args) {
        SpringApplication.run(SpringSecuritySsoAuthServerApplication.class, args);
    }
}
Create a new class AuthServerConfig in the config package as your application class
com.spring.springsecurityssoauthserver.config
under src/main/java (from now on please create Java classes in src/main/java/com/spring/springsecurityssoauthserver/config/AuthServerConfig). This Spring configuration class helps to enable and configure authorization server.
package com.spring.springsecurityssoauthserver.config;
import org.springframework.beans.factory.annotation.Autowired;
import org.springframework.context.annotation.Configuration;
import org.springframework.security.crypto.bcrypt.BCryptPasswordEncoder;
import org.springframework.security.oauth2.config.annotation.configurers.ClientDetailsServiceConfigurer;
import org.springframework.security.oauth2.config.annotation.web.configuration.AuthorizationServerConfigurerAdapter;
import org.springframework.security.oauth2.config.annotation.web.configuration.EnableAuthorizationServer;
import org.springframework.security.oauth2.config.annotation.web.configurers.AuthorizationServerSecurityConfigurer;


@Configuration
@EnableAuthorizationServer
public class AuthServerConfig extends AuthorizationServerConfigurerAdapter {

    @Autowired
    private BCryptPasswordEncoder passwordEncoder;

    @Override
    public void configure(final AuthorizationServerSecurityConfigurer oauthServer) throws Exception {
        oauthServer.tokenKeyAccess("permitAll()")
            .checkTokenAccess("isAuthenticated()");
    }
    @Override
    public void configure(final ClientDetailsServiceConfigurer clients) throws Exception {
        clients.inMemory()
            .withClient("SampleClientId")
            .secret(passwordEncoder.encode("secret"))
            .authorizedGrantTypes("authorization_code")
            .scopes("user_info")
            .autoApprove(true)
            .redirectUris("http://localhost:8082/ui/login","http://localhost:8083/ui2/login","http://localhost:8082/login","http://www.example.com/");
        // .accessTokenValiditySeconds(3600) // 1 hour
    }
}
The AuthServerConfig class is the class that will create and return our JSON web tokens when the client properly authenticates.
Create a new class SecurityConfig in the config package as your application class
com.spring.springsecurityssoauthserver.config
under src/main/java (from now on please create Java classes in src/main/java/com/spring/springsecurityssoauthserver/config/SecurityConfig).
package com.spring.springsecurityssoauthserver.config;
import org.springframework.context.annotation.Bean;
import org.springframework.context.annotation.Configuration;
import org.springframework.core.annotation.Order;
import org.springframework.security.config.annotation.authentication.builders.AuthenticationManagerBuilder;
import org.springframework.security.config.annotation.web.builders.HttpSecurity;
import org.springframework.security.config.annotation.web.configuration.WebSecurityConfigurerAdapter;
import org.springframework.security.crypto.bcrypt.BCryptPasswordEncoder;
@Configuration
@Order(1)
public class SecurityConfig extends WebSecurityConfigurerAdapter {

    @Override
    protected void configure(HttpSecurity http) throws Exception { // @formatter:off
        http.requestMatchers()
            .antMatchers("/login", "/oauth/authorize")
            .and()
            .authorizeRequests()
            .anyRequest()
            .authenticated()
            .and()
            .formLogin()
            .permitAll()
            .and().csrf().disable();
    } // @formatter:on
    @Override
    protected void configure(AuthenticationManagerBuilder auth) throws Exception { // @formatter:off
        auth.inMemoryAuthentication()
            .withUser("ravi_mengar")
            .password(passwordEncoder().encode("12345"))
            .roles("USER");
    } // @formatter:on
    @Bean
    public BCryptPasswordEncoder passwordEncoder(){
        return new BCryptPasswordEncoder();
    }
}
The SecurityConfiguration class is the class that actually authenticates requests to your authorization server.
Lastly, create a Java class called UserController:
package com.spring.springsecurityssoauthserver.config;

import java.security.Principal;
import org.springframework.web.bind.annotation.RequestMapping;
import org.springframework.web.bind.annotation.RestController;

@RestController
public class UserController {
    @RequestMapping("/user/me")
    public Principal user(Principal principal) {
        System.out.println(principal);
        return principal;
    }
}
This file permits the client apps to find out more about information of the users that authenticate with the server. That's your authorization server! Not too bad. Spring Boot makes it pretty smooth. Four files and some properties. Now, move on to creating a client app you can use to test the auth server.
Start the authorization server:

Wait a bit for it to finish running. The terminal should end with something like this:
____         _            __ _ _
 /\\ / ___'_ __ _ _(_)_ __  __ _ \ \ \ \
( ( )\___ | '_ | '_| | '_ \/ _` | \ \ \ \
 \\/  ___)| |_)| | | | | || (_| |  ) ) ) )
  '  |____| .__|_| |_|_| |_\__, | / / / /
 =========|_|==============|___/=/_/_/_/
 :: Spring Boot ::        (v2.1.8.RELEASE)
10:28:37.987 [main] INFO o.s.c.s.PostProcessorRegistrationDelegate$BeanPostProcessorChecker - Bean 'org.springframework.cloud.autoconfigure.ConfigurationPropertiesRebinderAutoConfiguration' of type [org.springframework.cloud.autoconfigure.ConfigurationPropertiesRebinderAutoConfiguration$$EnhancerBySpringCGLIB$$28cb6907] is not eligible for getting processed by all BeanPostProcessors (for example: not eligible for auto-proxying)
10:28:38.135 [main] INFO o.s.b.w.e.tomcat.TomcatWebServer - Tomcat initialized with port(s): 8081 (HTTP)
...
...
10:28:39.484 [main] INFO o.s.b.w.e.tomcat.TomcatWebServer - Tomcat started on port(s): 8081 (http) with context path '/auth'
10:28:39.485 [main] INFO c.s.s.SpringSecuritySsoAuthServerApplication - Started SpringSecuritySsoAuthServerApplication in 2.73 seconds (JVM running for 3.242)
Build Your Client App
Back to Spring Initializr. Create a new project with the following settings:
- The project type should be Maven (not Gradle).
- Group: com.spring.
- Artifact: spring-security-sso-client-server
- Add three dependencies: Web, Thymeleaf, OAuth2 Client.
Download the project and copy it in your system.
Create the src/main/resources/application.yml to match:
server:
    port: 8083
    servlet:
      context-path: /ui2
security:
  oauth2:
    client:
      clientId: SampleClientId
      clientSecret: secret
      accessTokenUri: http://localhost:8081/auth/oauth/token
      userAuthorizationUri: http://localhost:8081/auth/oauth/authorize
    resource:
      userInfoUri: http://localhost:8081/auth/user/me
spring:
  thymeleaf:
    cache: false
Update the src/main/resources/application.properties to match:
server.servlet.session.cookie.name=UI2SESSION
Update the SpringSecuritySsoClientServerApplication class to match:
package com.spring.springsecurityssoclient;
import org.springframework.boot.SpringApplication;
import org.springframework.boot.autoconfigure.SpringBootApplication;
import org.springframework.boot.web.servlet.support.SpringBootServletInitializer;
import org.springframework.context.annotation.Bean;
import org.springframework.web.context.request.RequestContextListener;

@SpringBootApplication
public class SpringSecuritySsoClientApplication extends SpringBootServletInitializer {
 @Bean
 public RequestContextListener requestContextListener() {
         return new RequestContextListener();
 }

 public static void main(String[] args) {
  SpringApplication.run(SpringSecuritySsoClientApplication.class, args);
 }
}
Create a new class ClientWebConfig in the same package as your application class com.spring.springsecurityssoclientserver under src/main/java(from now on please create Java classes in
src/main/java/com/spring/springsecurityssoclientserver/ClientConfig).
package com.spring.springsecurityssoclient;
import org.springframework.context.annotation.Bean;
import org.springframework.context.annotation.Configuration;
import org.springframework.context.support.PropertySourcesPlaceholderConfigurer;
import org.springframework.web.servlet.config.annotation.*;

@Configuration
@EnableWebMvc
public class ClientWebConfig implements WebMvcConfigurer {
    @Bean
    public static PropertySourcesPlaceholderConfigurer propertySourcesPlaceholderConfigurer() {
        return new PropertySourcesPlaceholderConfigurer();
    }
    @Override
    public void configureDefaultServletHandling(final DefaultServletHandlerConfigurer configurer) {
        configurer.enable();
    }
    @Override
    public void addViewControllers(final ViewControllerRegistry registry) {
        registry.addViewController("/")
            .setViewName("forward:/index");
        registry.addViewController("/index");
        registry.addViewController("/securedPage");
    }
    @Override
    public void addResourceHandlers(final ResourceHandlerRegistry registry) {
        registry.addResourceHandler("/resources/**")
            .addResourceLocations("/resources/");
    }
}
Create a new class ClientSecurityConfig in the same package as your application class com.spring.springsecurityssoclientserver under src/main/java (from now on please create Java classes in src/main/java/com/spring/springsecurityssoclientserver/ClientConfig).
package com.spring.springsecurityssoclient;
import org.springframework.boot.autoconfigure.security.oauth2.client.EnableOAuth2Sso;
import org.springframework.context.annotation.Configuration;
import org.springframework.security.config.annotation.web.builders.HttpSecurity;
import org.springframework.security.config.annotation.web.configuration.WebSecurityConfigurerAdapter;


@EnableOAuth2Sso
@Configuration
public class ClientSecurityConfig extends WebSecurityConfigurerAdapter {
    @Override
    public void configure(HttpSecurity http) throws Exception {
        http.antMatcher("/**")
            .authorizeRequests()
            .antMatchers("/", "/login**")
            .permitAll()
            .anyRequest()
            .authenticated();
    }
}
This class defines the Spring Security configuration for your application: permitting all requests on the home path and requiring authentication for all other routes. it also establishes the Spring Boot OAuth login flow.
The final files you need to add are the two Thymeleaf template files. you can check their website for more information about Thymeleaf templating.
The templates go within the src/main/resources/templates directory. You'll be aware in the controller above that they're simply returning strings for the routes. When the Thymeleaf dependencies are included in the build, Spring Boot assumes you're returning the name of the template file from the controllers, and so the app will look in src/main/resources/templates for a file name with the returned string plus .html.
Create the home template: src/main/resources/templates/index.html:
<!DOCTYPE html>
<html lang="en">
<head>
<meta http-equiv="Content-Type" content="text/html; charset=utf-8" />
<title>Spring Security SSO Client 2</title>
<link rel="stylesheet"
 href="https://maxcdn.bootstrapcdn.com/bootstrap/3.3.2/css/bootstrap.min.css" />
</head>
<body>
<div class="container">
 <div class="col-sm-12">
  <h1>Spring Security SSO Client 2</h1>
  <a class="btn btn-primary" href="securedPage">Login</a>
 </div>
</div>
</body>
</html>
And the secured template : src/main/resources/templates/securedPage.html:
<!DOCTYPE html>
<html lang="en">
<head>
<meta http-equiv="Content-Type" content="text/html; charset=utf-8" />
<title>Spring Security SSO Client 2</title>
<link rel="stylesheet"
 href="https://maxcdn.bootstrapcdn.com/bootstrap/3.3.2/css/bootstrap.min.css" />
</head>
<body>
<div class="container">
 <div class="col-sm-12">
  <h1>Secured Page</h1>
  Welcome, <span th:text="${#authentication.name}">Name</span>
  <br/>
        Your authorities are <span th:text="${#authentication.authorities}">authorities</span>
 </div>
</div>
</body>
</html>
I'll just point out this one line:
<span th:text="${#authentication.name}">Name</span>
The name of the authenticated user will be inserted in this line. This line is why you needed the thymeleaf dependency in the pom.xml file.
Start the client application:

Wait a moment for it to finish. The terminal should end with something like this:
.   ____          _            __ _ _
 /\\ / ___'_ __ _ _(_)_ __  __ _ \ \ \ \
( ( )\___ | '_ | '_| | '_ \/ _` | \ \ \ \
 \\/  ___)| |_)| | | | | || (_| |  ) ) ) )
  '  |____| .__|_| |_|_| |_\__, | / / / /
 =========|_|==============|___/=/_/_/_/
 :: Spring Boot ::        (v2.1.8.RELEASE)
10:26:54.119 [main] INFO  c.s.s.SpringSecuritySsoClientApplication - Starting SpringSecuritySsoClientApplication on RSPLWS241 with PID 10176 (C:\Users\ravi.mengar\Downloads\spring-security-sso-client\spring-security-sso-client\target\classes started by ravi.mengar in C:\Users\ravi.mengar\Downloads\spring-security-sso-client\spring-security-sso-client)
10:26:54.121 [main] INFO  c.s.s.SpringSecuritySsoClientApplication - No active profile set, falling back to default profiles: default
10:26:54.933 [main] INFO  o.s.b.w.e.tomcat.TomcatWebServer - Tomcat initialized with port(s): 8083 (http)
10:26:54.944 [main] INFO  o.a.coyote.http11.Http11NioProtocol - Initializing ProtocolHandler ["http-nio-8083"]
10:26:54.951 [main] INFO  o.a.catalina.core.StandardService - Starting service [Tomcat]
10:26:54.951 [main] INFO  o.a.catalina.core.StandardEngine - Starting Servlet engine: [Apache Tomcat/9.0.24]
10:26:55.038 [main] INFO  o.a.c.c.C.[.[localhost].[/ui2] - Initializing Spring embedded WebApplicationContext
10:26:55.038 [main] INFO  o.s.web.context.ContextLoader - Root WebApplicationContext: initialization completed in 892 ms
10:26:55.570 [main] INFO  o.s.b.a.s.s.UserDetailsServiceAutoConfiguration -
Using generated security password: 56b2dbe5-4d40-41f8-a8dc-dd1479c4407f
10:26:55.637 [main] INFO  o.s.s.web.DefaultSecurityFilterChain - Creating filter chain: Ant [pattern='/**'], [org.springframework.security.web.context.request.async.WebAsyncManagerIntegrationFilter@627d8516, org.springframework.security.web.context.SecurityContextPersistenceFilter@26d820eb, org.springframework.security.web.header.HeaderWriterFilter@3f29e26, org.springframework.security.web.csrf.CsrfFilter@59496961, org.springframework.security.web.authentication.logout.LogoutFilter@4eb30d44, org.springframework.security.oauth2.client.filter.OAuth2ClientAuthenticationProcessingFilter@5c10285a, org.springframework.security.web.savedrequest.RequestCacheAwareFilter@9fec931, org.springframework.security.web.servletapi.SecurityContextHolderAwareRequestFilter@5246a3b3, org.springframework.security.web.authentication.AnonymousAuthenticationFilter@6b667cb3, org.springframework.security.web.session.SessionManagementFilter@4393593c, org.springframework.security.web.access.ExceptionTranslationFilter@1ad8df52, org.springframework.security.web.access.intercept.FilterSecurityInterceptor@10ee04df]
10:26:55.735 [main] INFO  o.a.coyote.http11.Http11NioProtocol - Starting ProtocolHandler ["http-nio-8083"]
10:26:55.752 [main] INFO  o.s.b.w.e.tomcat.TomcatWebServer - Tomcat started on port(s): 8083 (http) with context path '/ui2'
10:26:55.755 [main] INFO  c.s.s.SpringSecuritySsoClientApplication - Started SpringSecuritySsoClientApplication in 1.892 seconds (JVM running for 2.414)
Test the Resource Server
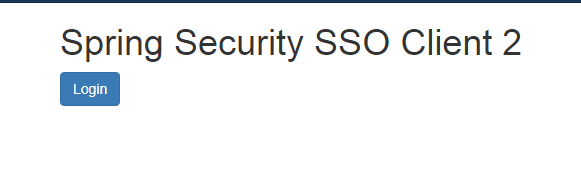
Navigate in your browser of choice to your client app at http://localhost:8083/.
Click the Login link.
You'll be directed to the login page:

Enter username ravi_mengar and password 12345 (from the application.properties file from the authentication server).
Click Sign In and you'll be taken to the super fancy securedPage.html template that should say "Secured Page" and "ravi_mengar" with authorities.
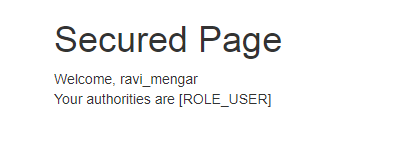
Great! It's working.
You can stop both the authorization server and client-server applications.
You can see the completed code for this tutorial on GitHub at RaviMengar/spring-security-OAuth2.0. If you liked what you read then give me a star on Github and share this article with your friends and colleagues.
